Showing posts with label Setup. Show all posts

Tuesday, February 3, 2015

Remote Control Your Raspberry Pi With SSH

One thing good about Raspberry Pi is after you set it up, it only require a power supply and a network to work. You don't need to always keep it around your TV to work with your Raspberry Pi. As long as your RPi is connected to your home network (WiFi or LAN), You can always remote control your RPi through 3rd party application via your home network.

I'm going to cover on how to setup SSH connection between you RPi and PC/Android Smartphone/Android Tablet.

Here is what you need to install on your client devices before proceed to configure your RPi. I assume you will use PC, android tablet or android smartphone as your client device to connect to your RPi and control it remotely.

(i) PC
  • Putty (Go to Intel x86 section and download Putty.exe, not require installation)
(ii) Android Tablet/Smartphone
  • JuiceSSH (Go to Google Play or click on link to install JuiceSSH app)

SSH (Command Line Interface)

This is the simplest way of remote control your Pi. The SSH server is available out of the box for Raspbian, all you need to do is just enable it through Raspi-config and you will be able to control your RPi through command line interface.

To enable your SSH server, if you are in command line interface after boot up, simply type"sudo raspi-config" and press enter. You will see the command line interface pop up as shown in Figure1. You can do so in desktop session as well by enter the same command through Terminal.

Figure1: Bring up raspi-config Command Line Interface

Using keyboard to navigate to "8 Advanced Options" and press enter. You should see second command line interface like Figure2.

Figure2: Advance Options Command Line Interface

Using keyboard to navigate to "A4 SSH" and press enter. You should see a message like Figure3 asking whether you like to enable SSH server or not. Select "Enable" and press enter.
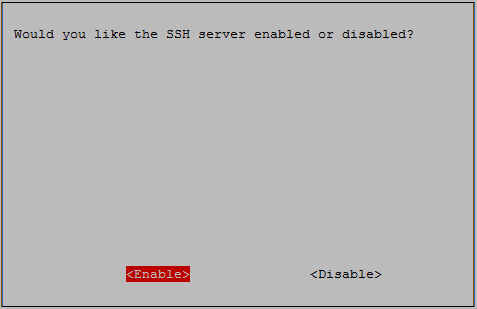
Figure3: Raspi-config Enable SSH Message

Once you complete step above, your RPi's SSH server is enabled and ready to receive remote command. You can now connect to you RPi using client devices below:

PC

There are a wide range of SSH client available for PC, i will recommend to use Putty since it is pretty user friendly and it doesn't require installation. In earlier section i require you to download Putty. Now go to the location of Putty and double click it. You should see a interface like Figure4 below:

Figure4: Putty's Interface

Once you see Figure4, you just need to type in your RPi's IP address and click "Open" button to start a SSH session with your RPi. Putty will prompt you whether you would like to remember your RPi's keys, just click "Yes" and continue. You should see Figure5 below.

Figure5: Login to Your RPi

If you see Figure5, you need to type in your RPi's user name and password. Default user name for RPi is "pi" and password "raspberry". You won't be able to see your password when you type it in for security purpose. Once you key in your user name and password correctly, you should see system message appearing and look like Figure6 below.

Figure6: RPi is Ready to Receive Remote Command


Android Smartphone / Tablet

There are several SSH client available in Google Play, i choose JuiceSSH because it is quite user friendly and it can manage your SSH connection quite well. Go to Google Play, search for JuiceSSH and install it.

Figure7: JuiceSSH, Android SSH Client

Tap the app icon once you install it. You will see the app GUI like in Figure8. Tap on connection button and then you will see a "+" yellow button on bottom right of your screen. Tap on it to create a new connection.

Figure8: Create New Connection in JuiceSSH

Next you will see a page with some field require to fill up for your SSH connection. Please refer to figure9. You will need to fill up "Address" field with you RPi's IP address, tap "Identity" field to create a new identity "pi", you can also change your identity to your other RPi user name. Lastly key in "22" into "Port" field as we will be using default SSH port. Tap tick button on top right of GUI to finish setup your connection.

Figure9: Fill up Necessary Info for SSH Connection

Once complete, you will go back to connection GUI and you should see a new connection appear. Refer to Figure10. Tap on that connection you will see some connection message and then app will prompt you to enter password, enter your RPi password (default is "raspberry") and you should be able to see similar terminal command line for RPi. If you already setup your password during last session, it will auto connect to your Pi with configured password.
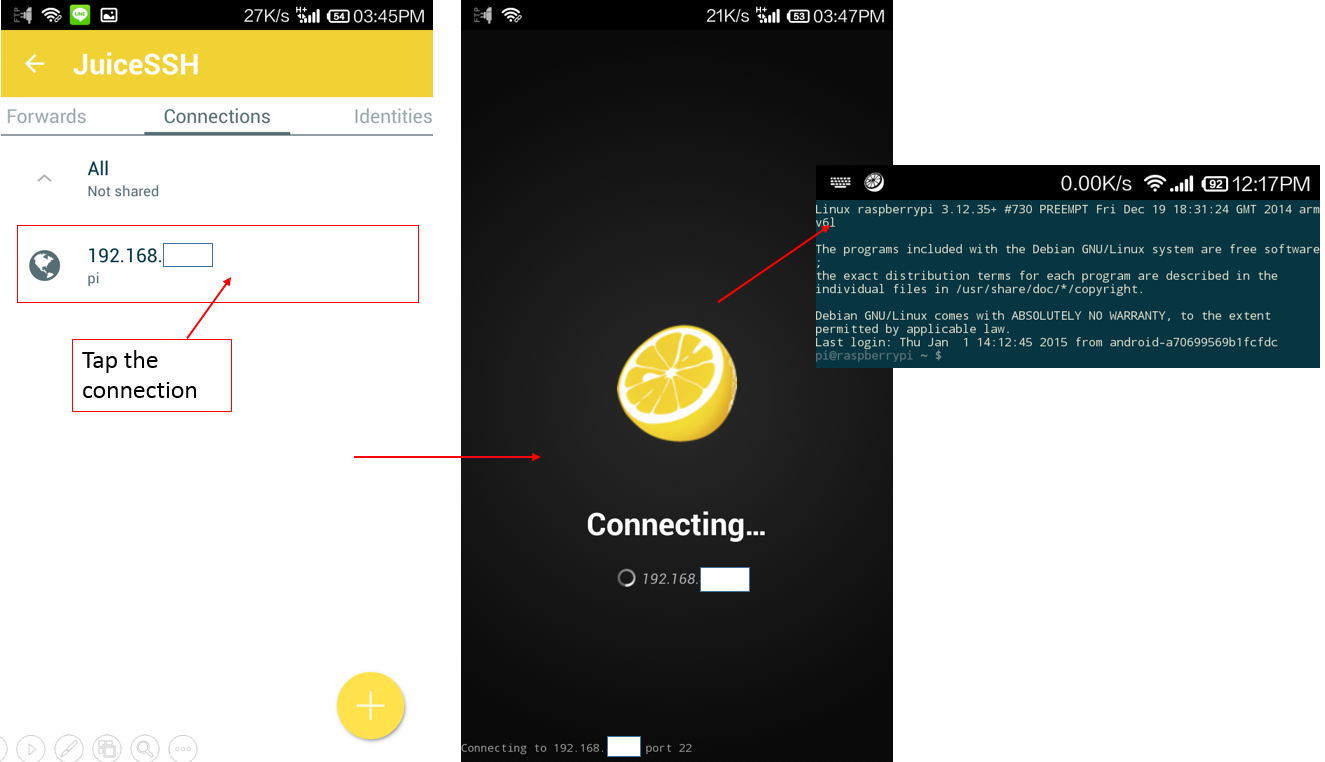
Figure10: Connecting to Your RPi Using JuiceSSH

There you go! Now your RPi is ready to receive remote command from your PC or Android! You can pretty much do everything just like working with Terminal in desktop session.


Reference:
http://www.chiark.greenend.org.uk/~sgtatham/putty/download.html

Sunday, June 29, 2014

Simple Test / Check of Power Supply for Raspberry Pi

There are numerous blog posts and forums that discuss about the suitable power supply that Raspberry Pi can operate on. In layman's term, as long as your power supply can support 5V and 1A, you Raspberry Pi should operate properly. However, there are questions remain, for example:

1. How can we be so sure that our power supply we use can supply 5V 1A all the time?
2. Can the power supply still supply 5V 1A to Raspberry Pi if we have several peripheral connected?


Today I'm going show a simple method on how to check your power supply whether it is good enough to support RPi's operation.

First you have to know some basic info on RPi's operating condition. You can get them HERE or HERE. I'm using a Model B board, so according to the sites, the operating voltage is from 4.75V to 5.25V. Operating current is from 700mA to 1500mA. I don't have a equipment to measure current consumption for now. So I'm going to assume the power supply i will use later can provide current that RPi requires.

Next, you should have the following hardware prepared. Refer to list below:

  • Raspberry Pi loaded with Raspbian. (Refer to HERE for more info, if you haven't install Raspbian)
  • Power Supply (I'm using a smartphone charger, refer to HERE for more info)
  • Wireless LAN USB adapter
  • USB Keyboard and Mouse
  • LAN cable (Hooked up through router or computer)
  • Multimeter (To measure voltage across Pi)

I've set my Pi to boot up normally and do not boot to GUI, this should keep the Pi's processes to minimum so that i can get good reading on Multimeter. You can set the RPi to boot without GUI loaded by typing command "sudo raspi-config" in LXTerminal and select option 3 to choose booting without GUI. After you finish the configuration, enter "sudo shutdown -r now" to reboot to apply changes.

You should also enable SSH in raspi-config so that you can still control your RPi remotely. Refer to HERE for more info.

I've configure my RPi through raspi-config to use normal operating condition for its processor, ie no overclocking, frequency set to default 700Mhz and no overvolt.

I also configure RPi's config.txt file to make sure RPi is turning on HDMI port even without HDMI connected. I was away from my TV when i was doing this test. So i had to change the config.txt file to tell RPi to keep turning on the HDMI port. Refer to HERE on how to edit you config.txt file.

We are going to monitor the voltage across RPi under different setup to see whether the power supply is indeed within 4.75 to 5.25V when operating. To achieve that we are going to measure the board using Multimeter on TP1 and TP2. You can check out Figure1 below for the location of TP1 and TP2 on board.

Figure1: Location of TP1 and TP2

Here is a list of hardware configuration i tested and its respective voltage level when i boot up my RPi.

Hardware Configuration Measured Voltage Across TP1 and TP2
Normal Mode + WLAN + LAN 4.76V
Normal Mode + WLAN 4.80V
Normal Mode + LAN + USB Keyboard + Mouse 4.83V
Normal Mode + LAN 4.87V
Normal / Idle Mode 4.91V
Power Down Mode 5.03V

Note:
  • As i mentioned earlier, i just boot up my RPi and did not boot GUI. So basically my RPi is idling and do nothing. I call this state of RPi, "Normal mode".
  • Power Down Mode is where i shutdown my RPi and leave the power supply on. I achieve this by sending in command "sudo shutdown -h -P now". This is a rough estimation of the voltage level that my smartphone charger provides to my RPi.

Based on the Multimeter's reading that i get under different hardware configuration, the RPi is operating within 4.75V to 5.25V. So in this simple test we can conclude that the power supply used is capable of providing enough power to RPi under normal usage.You might notice the lowest voltage reading is 4.76V (very close to 4.75V lower operating voltage) where WLAN and LAN were turn on at the same time. So from this test you know you should avoid turning on both network at the same time. =)


Now you might ask, what is the accuracy of that multimeter, and how reliable this method is on rating the power supply? I would say, these readings are all estimation and it is not 100% accurate. This method can just give you an idea on how well your power supply perform, based on the specs given.

Ideally, regardless of what hardware configuration you use, voltage across the TP1 and TP2 should be always within 4.75V and 5.25V. If one of the hardware combination caused voltage across TP1 and TP2 drop below 4.75V, we can say it is either one of the hardware consume too much power, or the power supply is not capable of provide enough power for RPi to operate normally.

Here are some pictures on the measurement i get during the test.

Figure2: Normal Mode + WLAN and LAN

Figure3: Normal Mode + WLAN

Figure4: Normal Mode + LAN + USB Keyboard + Mouse

Figure5: Normal Mode + LAN

Figure6: Normal / Idle Mode (No other hardware connected)

Figure7: Power Down Mode (Measurement after shutdown)

I hope this post will be useful for you. Enjoy! Feel free to drop your questions in comment. =)


Disclaimer: Please use this site's info at your own risk. I am not responsible for any damage to your RPi or you. Cheers =)

Reference:
http://elinux.org/R-Pi_Troubleshooting
http://elinux.org/RPi_Hardware

Saturday, June 21, 2014

Raspberry Pi First Boot Tutorial

Its been only a few days since i got my Raspberry Pi, i gotta say its not easy to get this little device to work especially on the part of getting RPi to select the desired video output. You have to do a lot of readings in the forum to understand how the RPi work and how to troubleshoot if something wrong happen.

Here is the tutorial of setting up your RPi for first boot, I'm going to share what problem i encountered during my setup as well so that you guys know what to do when you see the same problem. This tutorial is meant for Model B RPi NOOBS setup and assume you will use Window PC for setup. I hope you find this tutorial useful and informative. Enjoy!


Setting up SD card for first boot (NOOBS Setup)

Depends on the RPi package you purchase, some of the package comes with a SD card with RPi logo on it, some comes with the only RPi. For me, i purchase the package with 8GB SD card included, it is actually a micro SD to SD card slot + 8GB micro SD card. Click HERE if you want to find out how it looks like.


Let's start with a list of items required for initial setup. You can download the software required first as it will take a while (~1.3GB total). You can read the documentation in link below while waiting for download to complete.

Hardware required:
(i) PC with Window XP / Win 7
(ii) SD card reader

Software Required:
(i) SD Formatter v4.0 for Window - Click HERE to download
(ii) Download NOOBS 1.3.7 from RPi Web - Click HERE

Documentation:
(i) RPi Quick Start Guide V2 - Read HERE
(ii) RPi NOOBS Setup - Read HERE

Once you have download everything you need
1. Install SD Formatter v4.0 to your Window PC.
2. Plug in SD Card to your SD card reader and connect to your USB.
3. After window detect your SD card, inspect the content of the SD card. Some SD card already comes with NOOBS and OS installed, How to identify it?

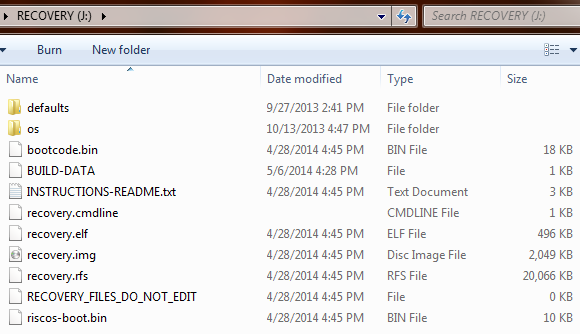
  •  Assuming you are using Win7, you should have detect one logic drive (~1GB in disk size) and it got NOOBS content inside the logic drive. (Refer to Figure1).
Figure1: SD Card with name "Recovery" & 1.38GB Size
  • If you see the 1GB drive please click Window's logo at bottom left of your screen, right click on "Computer" and click on "Manage" context menu. You should see Computer Management application start up in a short while. (Refer to Figure 2)
  • Click on "Disk Management", wait for a few seconds until you see a list of your PC's disk drive. (Refer to Figure 2)
  • If you notice there are two unknown logic drive (disk drive without name) in the list under your SD card, that's the Raspberry Pi's OS drive. It means your SD card already have RPi OS installed. (Refer to Figure 2)

Figure2: The RPi OS Partitions
  • Note** If you found the RPi OS in the SD card,  you can skip and go straight to "Readying Your Raspberry Pi for First Boot" Section. If you like start fresh you may continue to step 4.
4. Now that your SD card are ready. Let's start SD Formatter v4.0. You should see the program in Figure3 below.
  • Select the drive letter of your SD card.
  • Click on "Option" button and select "Format Type" to "Full" and "Format Size Adjustment" to "On".
  • I recommend to use the full format for first time setup. This will take a while so please wait for the program to complete format the SD card.
Figure3: SD Formatter 4.0 Interface.
5. After you complete format, you should see you SD card is completely empty and with the size of ~8GB.
6. Now extract the content of the NOOBS archive you have downloaded and copy all the files and folder to you SD card. (Refer to Figure 4 and 5)
Figure4: Extract All Files from NOOBS_v1_3_7.zip and copy them
Figure5: Paste the files in SD card
7. Once you done copy and paste all the files and folders to SD card. Your SD card is ready.


Readying You Raspberry Pi for First Boot

Once you complete setup your SD card, you are almost ready to boot up you RPi. Here are the list of hardware you should prepare before proceed to do so:

(i) USB Keyboard (Recommend not to use wireless keyboard)
(ii) USB Mouse (Recommend not to use wireless mouse)
(iii) TV with HDMI or RCA port
(iv) HDMI or RCA cable (Recommend to use HDMI for first boot)
(v) Micro USB cable
(vi) Smartphone charger with 5V 1A rating. 

Note** According to RPi web sites, your power supply require to have 5V, 700mA to 1000mA in order to make RPi work properly. So normal smartphone charger should be able to provide that power. However, you need to double confirm by looking at your smartphone charger power rating at the back of the charger. Every charger should have it. Make sure its stated 5V 1000mA / 1A. If no power rating on your charger, don't use it! It might damage your RPi. Refer to Figure6 for more detail.


Figure6: Smartphone Charger with recommended Power Rating

Now lets connect the parts together. Here are the steps. But i must let you know first, powering up your RPi should always be the last step. Otherwise your RPi will not work properly =)

1. Connect HDMI or RCA cable to your TV.
2. Connect the other end of the HDMI or RCA to your Raspberry Pi.
3. Connect USB keyboard and USB mouse to your RPi. 
4. Turn on your TV and switch to HDMI / RCA channel.
5. Connect your smartphone charger and RPi

Here is the picture of how it is connected. 
Figure7: RPi Connections to Hardware

You might notice my RCA connector is Red, that's because that's the only RCA cable lying in my house, the usual RCA connector for video feed suppose to be yellow. So don't get confuse. It doesn't matter what color it is as long as it can connect to your TV RCA connector properly.

6. Finally, turn on your smartphone charger to boot up RPi.


Now for those of you who use HDMI port, you should see NOOBS booting up on your TV and prompt a box to choose which OS to install to RPi. But...

For those who use RCA port, you should be getting a black screen instead. Don't worry, follow steps below:
  • Look at your RPi, you should see a red LED light and another flashing green LED light. 
  • Wait for green LED light to stop flashing. It should take only a few seconds.
  • Tap "Num Lock" button on your keyboard to make sure keyboard is working. You should see "Num Lock" LED light up when you tap it.
  • Now press 3 or 4 button on your keyboard. You should be getting your video feed now.   
Figure8: NOOBS, Choose which OS to install

Now that you get the video feed on TV, NOOBS should be up by now and you can choose which OS to install (Figure 8). For first time user, i recommend to install Raspbian to get familiar with how RPi works. I find the information on Raspbian is more on the net as well. So use your mouse to click on "Raspbian" check box and click "Install (i)" on the upper left of your screen. A progress box should be up by now. You have to wait for a while as it will takes some time to install the Raspbian. 

Once installation of Raspbian is complete, you should see Figure9 on your TV, if you are using HDMI. You can configure your time zone and keyboard layout. The rest of the options let's leave them alone for now. Use your keyboard to navigate, when complete, press "Tab", select "Finish" and press enter. You should be able to continue boot to Raspbian.


Edit: I recommend to enable ssh by navigate to Advanced Options and press enter, select SSH and press enter and enable it. This will enable you to connect to your RPi remotely. I will cover this SSH option in the next post.

Figure9: Rasp-config for First Time Use


Additional Info: RCA Port Troubleshooting

Now for those of you who use RCA, if you see only a black screen for a long time after Raspbian installation complete, then bad luck. You got more work. Other wise you can skip this entire section on RCA troubleshooting if you can see Figure9 on your TV.

I'll explain briefly on how to fix this. You need to do a hard reboot (Turn off the power supply to RPi), and boot into NOOBS, (ie recovery mode for RPi) to edit the config.txt file for Raspbian (The instruction for RPi to follow during Raspbian boot) to force turn on RCA video output, and the tricky part is you have to boot into NOOBS without a TV output. Yeah =) So carefully follow the steps below:
  • Wait for green LED light to stop flashing and red light stays constant. 
  • Turn off your smartphone charger (Do not pull out the micro USB cable from RPi !)
  • Put your finger on left "Shift" button on Keyboard (Just do it trust me =D )
  • Turn on smartphone charger again, wait for 3 to 5 seconds, then press and hold the left shift button.
  • You should see the green LED flash for a moment, then you can release the shift button and press 3 or 4 button. You should be able to get a TV output by now and you will see Figure8 on your TV again.


Congratulation! you have successfully boot into NOOBS again. You should be able to see Figure8 again. There are still more works to make sure RPi output video on RCA port. So stay with me for just a little bit. Here are the steps.
  • Select "Raspbian", by now you should see "Raspbian" is installed, click on the "Edit Config" on top left of the screen. You should be able to open the config.txt file for Raspbian.
  • Check on the lines that doesn't start with "#" character. If it is contain with "hdmi", add a "#" character at the beginning of the line. This will disable anything to do with HDMI configuration during boot.
  • Check for the lines that begins with "sdtv", that is your RCA configuration. Remove the "#" character in the beginning of the line.
  • Insert these two lines "sdtv_mode=2" and "sdtv_aspect=3" if you cannot find it in your config.txt file. This will set your RPi to output video of Normal PAL standard for TV with aspect ratio of 16:9. If you want aspect ratio of 4:3, change second line into "sdtv_aspect=1"
  • Search for lines with "overscan", remember to remove the "#" character.
  • Finally, search for line with "disable_overscan", again, remove the "#" character. Make sure to set the disable_overscan to 0, ie change the text to "disavle_overscan=0"
  • Save the config.txt file and press "Esc" button to continue booting Raspbian.
Now everything is complete! You should be able to see Figure9. Continue to configure the Raspbian as i mentioned earlier and select "Finish" when you are done.


Botting Up Raspbian GUI

Figure10: The mystery word > pi@raspberrypi ~ $

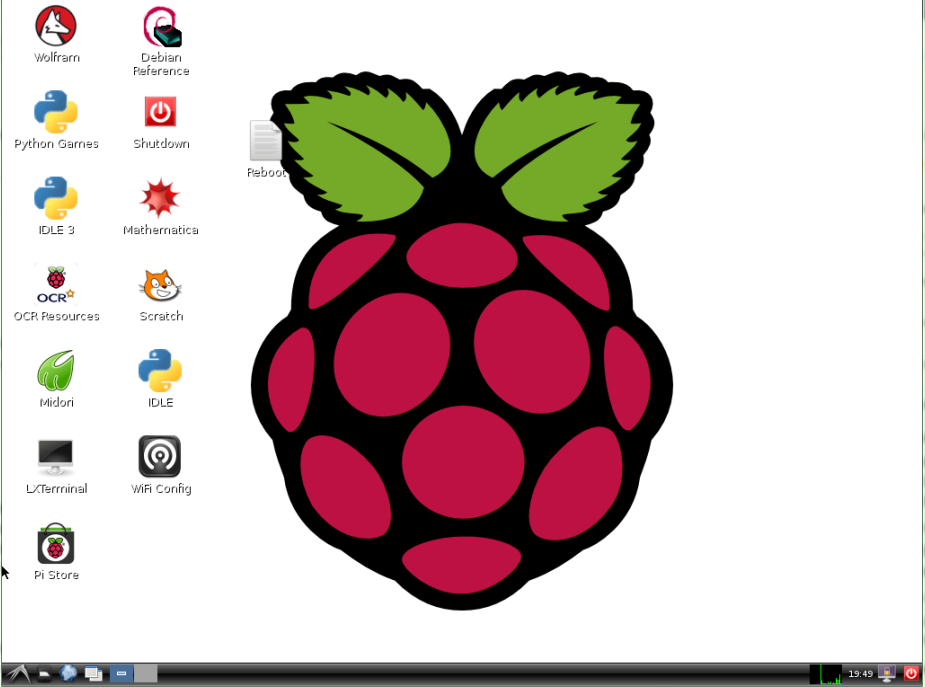
Once you complete configuration for Raspbian, it will continue by showing you its command interface. If it ask you for login, please key in "pi" as username and "raspberry" as password. You should see Figure10 once you successfully login to Raspbian. Type "startx" and press enter to begin GUI session. Now you should see Figure11.

Figure11: The Final Goal!

Congratulation! You have successfully booting up your RPi with Raspbian! Go ahead and navigate around. Get yourself a beer for your success, you deserve it. =) 

I'm very happy if you are reading this tutorial until here. I hope all this information is helpful for you =) feel free to drop a questions in comment if you need more info. I'll try my best to answer you.

You may read my next post on how to configure your RPi video output HERE in case your display still got problem. Happy tweaking your RPi!


Disclaimer: Please use this tutorial at your own risk. I am not responsible for any damage to your RPi or you. Cheers =)   

Reference:
1. http://elinux.org/RPi_config.txt 
2. http://elinux.org/R-Pi_Troubleshooting#Composite_displays_only_back_and_white_or_no_image