I'm going to cover on how to setup SSH connection between you RPi and PC/Android Smartphone/Android Tablet.
Here is what you need to install on your client devices before proceed to configure your RPi. I assume you will use PC, android tablet or android smartphone as your client device to connect to your RPi and control it remotely.
(i) PC
- Putty (Go to Intel x86 section and download Putty.exe, not require installation)
- JuiceSSH (Go to Google Play or click on link to install JuiceSSH app)
SSH (Command Line Interface)
This is the simplest way of remote control your Pi. The SSH server is available out of the box for Raspbian, all you need to do is just enable it through Raspi-config and you will be able to control your RPi through command line interface.
To enable your SSH server, if you are in command line interface after boot up, simply type"sudo raspi-config" and press enter. You will see the command line interface pop up as shown in Figure1. You can do so in desktop session as well by enter the same command through Terminal.
 |
| Figure1: Bring up raspi-config Command Line Interface |
Using keyboard to navigate to "8 Advanced Options" and press enter. You should see second command line interface like Figure2.
 |
| Figure2: Advance Options Command Line Interface |
Using keyboard to navigate to "A4 SSH" and press enter. You should see a message like Figure3 asking whether you like to enable SSH server or not. Select "Enable" and press enter.
 |
| Figure3: Raspi-config Enable SSH Message |
Once you complete step above, your RPi's SSH server is enabled and ready to receive remote command. You can now connect to you RPi using client devices below:
PC
There are a wide range of SSH client available for PC, i will recommend to use Putty since it is pretty user friendly and it doesn't require installation. In earlier section i require you to download Putty. Now go to the location of Putty and double click it. You should see a interface like Figure4 below:
 |
| Figure4: Putty's Interface |
Once you see Figure4, you just need to type in your RPi's IP address and click "Open" button to start a SSH session with your RPi. Putty will prompt you whether you would like to remember your RPi's keys, just click "Yes" and continue. You should see Figure5 below.
 |
| Figure5: Login to Your RPi |
If you see Figure5, you need to type in your RPi's user name and password. Default user name for RPi is "pi" and password "raspberry". You won't be able to see your password when you type it in for security purpose. Once you key in your user name and password correctly, you should see system message appearing and look like Figure6 below.
 |
| Figure6: RPi is Ready to Receive Remote Command |
Android Smartphone / Tablet
There are several SSH client available in Google Play, i choose JuiceSSH because it is quite user friendly and it can manage your SSH connection quite well. Go to Google Play, search for JuiceSSH and install it.
 |
| Figure7: JuiceSSH, Android SSH Client |
Tap the app icon once you install it. You will see the app GUI like in Figure8. Tap on connection button and then you will see a "+" yellow button on bottom right of your screen. Tap on it to create a new connection.
 |
| Figure8: Create New Connection in JuiceSSH |
Next you will see a page with some field require to fill up for your SSH connection. Please refer to figure9. You will need to fill up "Address" field with you RPi's IP address, tap "Identity" field to create a new identity "pi", you can also change your identity to your other RPi user name. Lastly key in "22" into "Port" field as we will be using default SSH port. Tap tick button on top right of GUI to finish setup your connection.
 |
| Figure9: Fill up Necessary Info for SSH Connection |
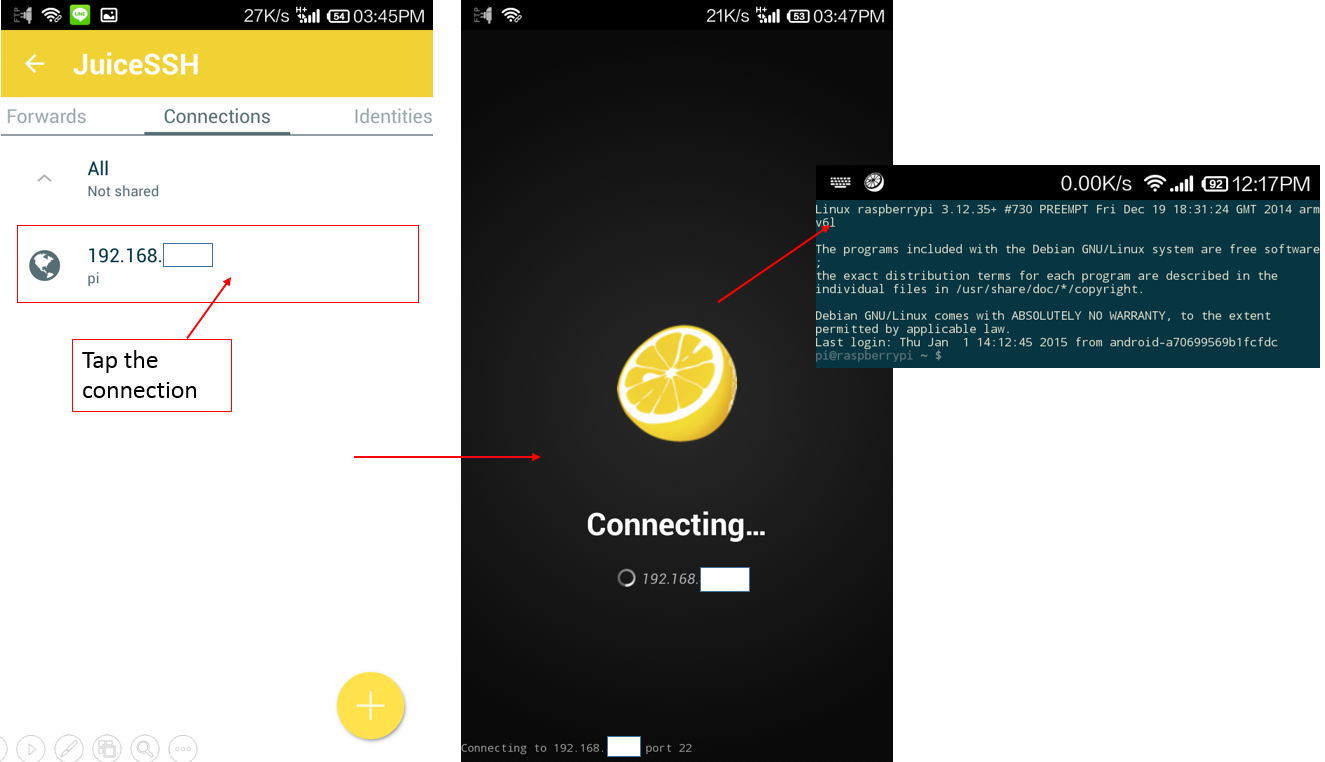
Once complete, you will go back to connection GUI and you should see a new connection appear. Refer to Figure10. Tap on that connection you will see some connection message and then app will prompt you to enter password, enter your RPi password (default is "raspberry") and you should be able to see similar terminal command line for RPi. If you already setup your password during last session, it will auto connect to your Pi with configured password.
 |
| Figure10: Connecting to Your RPi Using JuiceSSH |
There you go! Now your RPi is ready to receive remote command from your PC or Android! You can pretty much do everything just like working with Terminal in desktop session.
Reference:
http://www.chiark.greenend.org.uk/~sgtatham/putty/download.html
No comments:
Post a Comment