Sunday, May 14, 2017

Audio Streaming to Bluetooth Speaker Using Raspberry Pi B+ (Raspbian Jessie Solution)

Been a while since my last post. Totally crazy year for me last year.

Alright, for those who come from my previous post of bluetooth audio streaming using Raspberry Pi. I finally found a proper procedure to setup bluetooth device in Raspbian Jessie using solely command line only. This method will work on Raspbian Jessie lite version as well. Let's start.

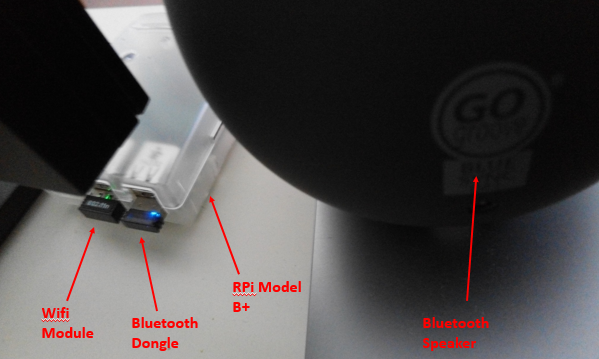
My hardware setup is the same as shown in my previous post. The differences start on the software setup side. Assuming you already flash fresh Raspbian on your Pi (Mine is Raspbian Jessie dated on 2nd March 2017). Firstly we need to install additional packages using command below.
  • sudo apt-get update && sudo apt-get upgrade
  • sudo apt-get install alsa-utils bluez bluez-tools pulseaudio pulseaudio-module-bluetooth
Once installation complete. Type in command below to make sure PulseAudio is working. Use any command below for verification.
  • pactl list sources short (List available audio sources with simplified format)
  • pactl list sources (List available audio sources with more details)
Above command should provide you a list audio sources available. By now you should see only one audio source. Below is the output example from my Raspberry Pi using command pactl list sources short.
  • 0       alsa_output.platform-soc_audio.analog-stereo.monitor    module-alsa-card.c      s16le 2ch 44100Hz       SUSPENDED
If you see same output above in your Pi that means your PulseAudio is working properly. Here are some simple explanation on the output. 0 means the unique id of your audio source, alsa_output.platform-soc_audio.analog-stereo.monitor is the name of your audio source, module-alsa-card.c is the driver name, s16le 2ch 44100Hz is audio source's sample specification and SUSPENDED means the audio source state is currently suspended.

Next, it is time for us to setup the bluetooth speaker. Follow instructions below:
  1. Type in bluetoothctl in terminal to enter bluetooth command line terminal. You should see the next line in terminal start with [bluetooth]# once you press enter.
  2. Type in power on and press enter. You should see output "Changing power on succeeded" from terminal.
  3. Type in agent on and press enter. You should see output "Agent registered" from terminal.
  4. Type in default-agent and press enter. You should see output "Default agent request successful" from terminal.
  5. Type in discoverable on and press enter. You need to key in this command to make sure your bluetooth dongle is visible to your bluetooth speaker. You should see output "Changing discoverable on succeeded [CHG] Controller XX:XX:XX:XX:XX:XX Discoverable: yes" from terminal. The string XX:XX:XX...XX is your bluetooth dongle's mac address.
  6. [Optional] If you see message from terminal state "[CHG] Controller XX:XX:XX:XX:XX:XX Discoverable: no", just repeat step 5 to make your device discoverable again.
  7. Turn on your bluetooth speaker and set it to pairing mode. (Follow your bluetooth speaker manual to set it to pairing mode)
  8. Type in scan on to start scanning for bluetooth devices. You should see a similar message "[NEW] Device YY:YY:YY:YY:YY:YY BLUE SYNC OR3". For my case my bluetooth speaker name is Blue Sync OR3. YY:YY:YY...YY is the bluetooth speaker mac address.
  9. Type in pair YY:YY:YY:YY:YY:YY to pair with the bluetooth speaker. You will see a bunch of message and ends with message "[CHG] Device YY:YY:YY:YY:YY:YY Paired: yes Pairing successful" if pairing successful.
  10. Type in trust YY:YY:YY:YY:YY:YY to enable authentication-less connection with your bluetooth speaker. You should see a message "[CHG] Device YY:YY:YY:YY:YY:YY Trusted: yes".
  11. Type in connect YY:YY:YY:YY:YY:YY to establish connection to bluetooth speaker. You should see output "Attempting to connect to YY:YY:YY:YY:YY:YY [CHG] Device YY:YY:YY:YY:YY:YY Connected: yes Connection successful" from terminal if connection is successful.
  12. Type in exit to exit from bluetooth command line terminal.
Once you successfully establish connection to your bluetooth speaker, you should be able to see new bluetooth audio sink available in the Pi. To verify this, type in pactl list sinks short to check how many audio sinks available in your Pi. You should see output below:
  • 0       alsa_output.platform-soc_audio.analog-stereo    module-alsa-card.c     s16le 2ch 44100Hz        SUSPENDED
  • 1       bluez_sink.YY_YY_YY_YY_YY_YY    module-bluez5-device.c  s16le 2ch 44100Hz       SUSPENDED
The second output show in terminal is my bluetooth speaker's audio sink. The name of the device usually similar to bluez_sink.YourDeviceMacAddress. If you see this in your Pi, that means PulseAudio is picking up your bluetooth speaker properly.

Now that we have almost everything ready, the trick is to redirect whatever source that is playing in Raspberry Pi and send the audio signal to your bluetooth speaker. To do this, we need to send another command to PulseAudio so that it will establish an audio link between the source and sink. Now remember in earlier section where we use one command to verify PulseAudio after its installation? That is the method we identify the audio source. We've already identify the name of the source audio to be alsa_output.platform-soc_audio.analog-stereo.monitor and its unique id is 0. We also know that our audio sink name is bluez_sink.YY_YY_YY_YY_YY_YY and its unique id is 1. Let's key in command below to establish the link between the require source and sink.
  • pactl load-module module-loopback source=0 sink=1 rate=44100 adjust_time=0
Once you enter the command, key in top in terminal and you should see pulseaudio is utilizing around 11-12% of your CPU power. This indicates you successfully establish the link between audio source and sink. Press Q to quit top.

Lastly we need to test whether the bluetooth speaker is playing the audio properly. Similar to my previous post, I'll use mplayer to test it, so go ahead and install mplayer by type in command sudo apt-get install mplayer2. Wait for the installation to complete.

I will recommend to set the source volume to 50% first because by default it is set to 100%. If you play a song using 100% i think it is not going to be pleasant to your ear. So go ahead type in pactl set-source-volume 0 32768 in your command line and press enter. 0 is the unique id of your source audio and 32768 represent 50% of volume. If volume = 100% the value is 65536. So if you want to set your own level of volume by percentage X, the formula is (X * 65536 / 100). You can verify the current volume level by type in command pactl list sources, Look for details under "Source#0 -> Volume:".

Once mplayer2 installation complete, simply upload one MP3 file to your Pi for testing. In command line, type in mplayer -ao help to list available audio output driver visible to mplayer. You should see one PulseAudio driver in the output. The output look like this "pulse   PulseAudio audio output".

Type in command mplayer -ao pulse path_to_your_song.mp3 to start playing a song. You should be able to hear the song playing from your bluetooth speaker. It will play exactly like video shown in my previous post.


Thanks for reading! Enjoy playing with your bluetooth speaker using latest Raspbian Jessie!


Additional note:
  1. To remove the link between audio source and sink when you are not using it. Simply type in command pactl unload-module module-loopback.
  2. pacmd set-source-volume 0 32768 command works as well to set source volume.
  3. You can also set sink volume using command pacmd set-sink-volume 1 32768. Remember use pactl list sinks short command to find out the unique id of your desired bluetooth speaker.


Reference:
https://gist.github.com/oleq/24e09112b07464acbda1
Blogger Tricks

Sunday, July 3, 2016

Raspberry Pi 3 Unboxing!

Its been a while since my last post, was busy working on stuffs and finally got some time to do this again.

The Raspberry Pi 3 unboxing! Finally got my hands on one of the device and got a chance to take a few pictures.

Here you go. Enjoy the pictures!

Figure 1: The long awaited Raspberry Pi 3 in the box

Figure 2: The Pi Casing from RS
Figure 3: Taking apart the casing. Looks and feel sturdy than my last casing
Figure 4: Pi 3 board itself, HDMI angle
Figure 5: Pi 3 board, GPIO angle
Figure 6: Pi3 board, USB angle
Figure 7: Pi 3 board bottom view
Figure 8: Pi 3 board sitting on top of bottom casing
Figure 9: Pi 3 board with middle casing on top
Figure 10: Pi 3 with top casing mounted


Here is what i have for today! Overall the casing is quite solid, the top casing can be taken off easily to allow peripherals connected to the board, i think there is some room to place a fan as well. The casing won't slide easily when place on top of slippery surface due to the rubber at the bottom casing.

I managed to power up the Pi 3 as well, overall i did feel the startup speed improves compared to Pi 2, but based on my one day experience with Pi 3, generally i would say performance won't be a lot faster compared to Pi 2, maybe until we got a x64 raspbian available then we can know for sure. =)

Hope you enjoy the post! Thank you for reading!

Tuesday, September 22, 2015

Compile and Install R-3.1.2 (32-bit) in Raspberry Pi Model B/B+

Hey guys,

It's been a while since my last post. I've been playing with RPi for some chart plotting features recently and i found out that Raspberry Pi can in fact install pretty recent version of R. In this case, R-3.1.2. I've been using R for my work since few years ago and still loving it. Therefore i tried to install it into my RPi to see how it perform. The available version of R in apt-get repo is quite old, so in order to get more recent version of R, I have to compile it in RPi instead and install it in the system. I'll describe how to do it step by step in the next section.

** Note: Since we are compiling R, i do not recommend to run the compiling over SSH. Instead please start a desktop session through tightvnc. If you don't want to install tightvnc, you can connect your RPi to a monitor, keyboard and mouse during compiling.

When your desktop session is ready, please double click LXTerminal icon on the desktop and you will see a terminal window show up.

  1. We are going to need some extra packages installed in RPi in order to compile R. In the terminal window, type in "sudo apt-get install gfortran libreadline6-dev libx11-dev libxt-dev libpng-dev libjpeg-dev libcairo2-dev xvfb" (without the quote) and follow instruction from the apt-get prompt to install the necessary packages.
  2. Once complete step 1, type in "mkdir R_HOME && cd R_HOME", this command will create a folder name "R_HOME" under "/home/pi/" and then enter the new directory "R_HOME"
  3. Next, type in "wget http://cran.rstudio.com/src/base/R-3/R-3.1.2.tar.gz && tar zxvf R-3.1.2.tar.gz"  to download R-3.1.2 source archive file into the folder and extract it into "R_HOME" folder.
  4. Next type in "ls" command to ensure you have one directory "R-3.1.2" and the archive file "R-3.1.2.tar.gz" in "R_HOME" folder.
  5. Next type type in "cd R-3.1.2" to enter the extracted directory.
  6. Finally type in "./configure --with-cairo --with-jpeglib && make && sudo make install" to start source code compilation and installation. Take note that this process will take several hours to complete due to RPi's slow processor speed. You will see a lot of messages pop up in the window, just leave it until the process complete. After that you will see "pi@yourhostname ~/R_HOME/R-3.1.2 $" popup in window where yourhostname is the hostname you set for your RPi. Once you see that line that means the compilation and installation is complete.
  7. To verify whether R installation is complete, simply type "R" and type enter in the terminal window. You will see R console start up like figure below if everything goes well.

Well, that's it for now. I'll share some example of installing R packages like ggplot2 and running R to plot charts in the next post when I'm available.

Thanks for reading =)

Edit 20th Nov 2014: 
1. Add in additional libraries required at step 1 to enable additional plot output format capabilities (jpeg and png) on R during configuration.
2. Add in ./configure parameters at step 6 to ensure R compile with jpeg and png capabilities.


Reference:
1. http://stackoverflow.com/questions/28309891/install-r-3-1-2-on-wheezy-7-8-raspbian-fails
2. http://r.789695.n4.nabble.com/Compiling-R-3-1-0-on-debian-with-libpng-libjpeg-td4693026.html

Tuesday, February 3, 2015

Remote Control Your Raspberry Pi With SSH

One thing good about Raspberry Pi is after you set it up, it only require a power supply and a network to work. You don't need to always keep it around your TV to work with your Raspberry Pi. As long as your RPi is connected to your home network (WiFi or LAN), You can always remote control your RPi through 3rd party application via your home network.

I'm going to cover on how to setup SSH connection between you RPi and PC/Android Smartphone/Android Tablet.

Here is what you need to install on your client devices before proceed to configure your RPi. I assume you will use PC, android tablet or android smartphone as your client device to connect to your RPi and control it remotely.

(i) PC
  • Putty (Go to Intel x86 section and download Putty.exe, not require installation)
(ii) Android Tablet/Smartphone
  • JuiceSSH (Go to Google Play or click on link to install JuiceSSH app)

SSH (Command Line Interface)

This is the simplest way of remote control your Pi. The SSH server is available out of the box for Raspbian, all you need to do is just enable it through Raspi-config and you will be able to control your RPi through command line interface.

To enable your SSH server, if you are in command line interface after boot up, simply type"sudo raspi-config" and press enter. You will see the command line interface pop up as shown in Figure1. You can do so in desktop session as well by enter the same command through Terminal.

Figure1: Bring up raspi-config Command Line Interface

Using keyboard to navigate to "8 Advanced Options" and press enter. You should see second command line interface like Figure2.

Figure2: Advance Options Command Line Interface

Using keyboard to navigate to "A4 SSH" and press enter. You should see a message like Figure3 asking whether you like to enable SSH server or not. Select "Enable" and press enter.

Figure3: Raspi-config Enable SSH Message

Once you complete step above, your RPi's SSH server is enabled and ready to receive remote command. You can now connect to you RPi using client devices below:

PC

There are a wide range of SSH client available for PC, i will recommend to use Putty since it is pretty user friendly and it doesn't require installation. In earlier section i require you to download Putty. Now go to the location of Putty and double click it. You should see a interface like Figure4 below:

Figure4: Putty's Interface

Once you see Figure4, you just need to type in your RPi's IP address and click "Open" button to start a SSH session with your RPi. Putty will prompt you whether you would like to remember your RPi's keys, just click "Yes" and continue. You should see Figure5 below.

Figure5: Login to Your RPi

If you see Figure5, you need to type in your RPi's user name and password. Default user name for RPi is "pi" and password "raspberry". You won't be able to see your password when you type it in for security purpose. Once you key in your user name and password correctly, you should see system message appearing and look like Figure6 below.

Figure6: RPi is Ready to Receive Remote Command


Android Smartphone / Tablet

There are several SSH client available in Google Play, i choose JuiceSSH because it is quite user friendly and it can manage your SSH connection quite well. Go to Google Play, search for JuiceSSH and install it.

Figure7: JuiceSSH, Android SSH Client

Tap the app icon once you install it. You will see the app GUI like in Figure8. Tap on connection button and then you will see a "+" yellow button on bottom right of your screen. Tap on it to create a new connection.

Figure8: Create New Connection in JuiceSSH

Next you will see a page with some field require to fill up for your SSH connection. Please refer to figure9. You will need to fill up "Address" field with you RPi's IP address, tap "Identity" field to create a new identity "pi", you can also change your identity to your other RPi user name. Lastly key in "22" into "Port" field as we will be using default SSH port. Tap tick button on top right of GUI to finish setup your connection.

Figure9: Fill up Necessary Info for SSH Connection

Once complete, you will go back to connection GUI and you should see a new connection appear. Refer to Figure10. Tap on that connection you will see some connection message and then app will prompt you to enter password, enter your RPi password (default is "raspberry") and you should be able to see similar terminal command line for RPi. If you already setup your password during last session, it will auto connect to your Pi with configured password.

Figure10: Connecting to Your RPi Using JuiceSSH

There you go! Now your RPi is ready to receive remote command from your PC or Android! You can pretty much do everything just like working with Terminal in desktop session.


Reference:
http://www.chiark.greenend.org.uk/~sgtatham/putty/download.html

Thursday, January 1, 2015

Audio Streaming to Bluetooth Speaker Using Raspberry Pi B+

Edit 2016Jan3: This guide was based on old Raspbian Wheezy distro, some packages were no longer included in latest Raspbian Jessie distro. I'll have a look on how to make the old setting works on Raspbian Jessie.

Edit 2017May14: Finally found a way to make it work on Raspbian Jessie distro. Please refer to this link for instructions to setup bluetooth speaker.

Hi~ Here is a small project for my new RPi B+. So i got some bluetooth peripherals lying around the house, so i thought i can make a small music box using RPi. Did some research and got it working!

So here are what you need for the hardware:
  1. RPi Model B+ with Raspbian Installed (Should work with model B or A)
  2. Bluetooth Speaker
  3. USB Bluetooth dongle
  4. USB Wifi dongle / LAN cable for internet connection
  5. 5V 1A/2A Power Supply
Figure6: Hardware Setup
 If you have everything ready for the hardware. You need to install some packages to your RPi before you can connect to your bluetooth speaker. Boot up your RPi, but do not plug in your bluetooth dongle yet. Open up terminal and enter commands below for installation of the required packages.
  1. "sudo apt-get update && sudo apt-get upgrade" - upgrade your Raspbian packages list to latest version. Wait for program to finish upgrade before next command.
  2. "sudo apt-get install bluetooth bluez bluez-utils bluez-alsa blueman" - install five packages for bluetooth dongle and bluetooth audio. Wait for installation to complete before next command.
  3. "sudo usermod -a -G lp pi" - this command will add "lp" group under account "pi". You account need to have access to this group for this to work. If you are using other account, just replace the "pi" in command with your account name.
  4. "sudo nano /etc/bluetooth/audio.conf" - you need to add some command in the audio.conf file. This command will open nano text editor and allow you to edit the file. You need to add in two line in the file. "Enable=Source,Sink,Socket" and "Disable=Media". Refer to Figure1 and Figure2 below. After edit file, press Ctrl+O and Enter to save the file.
    Figure1: Editing audio.conf file
    Figure2: Add in highlighted two lines in audio.conf file
  5. Once save the file, enter command "sudo shutdown -h -P now" to safe shutdown the Pi. Once you see green light blip for 10 times. You can turn off the power supply.
  6. Now plug-in your bluetooth dongle to the USB and start up your RPi.
  7. Wait for boot complete, go to terminal and enter command "lsusb". You should see your bluetooth dongle available as shown in Figure3. You can refer HERE for list of working bluetooth adapter for RPi in case your bluetooth dongle is not detectable.
    Figure3: Bluetooth Dongle Detected in USB list
  8. If you able to find your bluetooth dongle in USB list, you should see a Bluetooth icon at your RPi tray. If you did not boot up your Pi in GUI and you are in command line interface, enter "startx" to start your GUI session. Refer to Figure4 below to setup your bluetooth connection with your bluetooth speaker with 3 simple steps.
    Figure4: Setup Bluetooth Connection with Your Bluetooth Speaker
  9. Follow up on step 8. You can also click "Trusted" on the device as shown in Figure4 if you want to let the speaker auto connect to RPi in the future. Mine is showing "Untrust" because i've already "Trusted" this device.
  10. Open up terminal again to edit one last file. Enter "sudo nano ~/.asoundrc" and enter the script as shown in Figure5. For line start with "device 00:", that the place where you put your bluetooth speaker's MAC address. You can find you MAC address in Figure4. Copy and paste in to the script. Once done save the file and you are done setting up the bluetooth portion for RPi.
    Figure5: Script to Connect Bluetooth to Alsa
  11. If you completed the steps up to 10, you are almost ready. You just need to install one more package so that you RPi can play music. In this case i recommend Mplayer because it is a terminal player that can support wide range of audio format including m4a. Go to terminal and enter "sudo apt-get install mplayer" and wait for installation complete.
  12. Once you complete installation of mplayer. Navigate to your music folder using terminal and then enter command "mplayer -volume 10 -ao alsa:device=bluetooth youmusic.mp3" to play music.
  13. You should be able to listen to your music from bluetooth speaker from now. 
  14. Here is the video showing the working bluetooth speaker using RPi.

Hope you like this tutorial. Thanks for your time!

Reference:
http://elinux.org/RPi_USB_Bluetooth_adapters
http://www.correderajorge.es/bluetooth-on-raspberry-audio-streaming/

Wednesday, December 31, 2014

Raspberry Pi Model B+ Unboxing!

Hi guys, it been a long time since i last update this blog. Here is something new for you. The Model B+ unboxing!

I've purchased this from element14 as well. Same purchasing procedure like my model B post here.

So without further delay, some pictures for you to see.

Element14 Packaging
The stuff inside the box


MC-RP002-CLR Pi casing, Wifi Module and Pi Model B+
Removing the plastic covers...

Here are some views from different angle of model B+...

B+ Side View 1: Micro USB, HDMI & RCA port
B+ Side View 2: LAN & USB ports
B+ Side View 3: The GPIOs
B+ Close Up Top View: The SMTs and BCM SoC
B+ Back View: The micro SD card slot
B+ with the casing and WiFi module installed
Powering on The B+

Here is a simple review on the casing, MC-RP002-CLR enclosure is pretty easy to use. It doesn't require a lot of work to install. The installation is available for download in the element14 page. 

Cons:
  1. The B+ board doesn't sit tightly in the casing, it still have small room for the board to move around inside the casing. 
  2. Don't ever drop the your B+ with the casing. Feels like it is going to break it you exert too much force.
Pros:
  1. You must install the rubber pad beneath your casing, it sits firmly on the desk and won't move around easily.
  2. Dust proof =)

That's it. Hope you enjoy this. Happy 2015!

Sunday, June 29, 2014

Simple Test / Check of Power Supply for Raspberry Pi

There are numerous blog posts and forums that discuss about the suitable power supply that Raspberry Pi can operate on. In layman's term, as long as your power supply can support 5V and 1A, you Raspberry Pi should operate properly. However, there are questions remain, for example:

1. How can we be so sure that our power supply we use can supply 5V 1A all the time?
2. Can the power supply still supply 5V 1A to Raspberry Pi if we have several peripheral connected?


Today I'm going show a simple method on how to check your power supply whether it is good enough to support RPi's operation.

First you have to know some basic info on RPi's operating condition. You can get them HERE or HERE. I'm using a Model B board, so according to the sites, the operating voltage is from 4.75V to 5.25V. Operating current is from 700mA to 1500mA. I don't have a equipment to measure current consumption for now. So I'm going to assume the power supply i will use later can provide current that RPi requires.

Next, you should have the following hardware prepared. Refer to list below:

  • Raspberry Pi loaded with Raspbian. (Refer to HERE for more info, if you haven't install Raspbian)
  • Power Supply (I'm using a smartphone charger, refer to HERE for more info)
  • Wireless LAN USB adapter
  • USB Keyboard and Mouse
  • LAN cable (Hooked up through router or computer)
  • Multimeter (To measure voltage across Pi)

I've set my Pi to boot up normally and do not boot to GUI, this should keep the Pi's processes to minimum so that i can get good reading on Multimeter. You can set the RPi to boot without GUI loaded by typing command "sudo raspi-config" in LXTerminal and select option 3 to choose booting without GUI. After you finish the configuration, enter "sudo shutdown -r now" to reboot to apply changes.

You should also enable SSH in raspi-config so that you can still control your RPi remotely. Refer to HERE for more info.

I've configure my RPi through raspi-config to use normal operating condition for its processor, ie no overclocking, frequency set to default 700Mhz and no overvolt.

I also configure RPi's config.txt file to make sure RPi is turning on HDMI port even without HDMI connected. I was away from my TV when i was doing this test. So i had to change the config.txt file to tell RPi to keep turning on the HDMI port. Refer to HERE on how to edit you config.txt file.

We are going to monitor the voltage across RPi under different setup to see whether the power supply is indeed within 4.75 to 5.25V when operating. To achieve that we are going to measure the board using Multimeter on TP1 and TP2. You can check out Figure1 below for the location of TP1 and TP2 on board.

Figure1: Location of TP1 and TP2

Here is a list of hardware configuration i tested and its respective voltage level when i boot up my RPi.

Hardware Configuration Measured Voltage Across TP1 and TP2
Normal Mode + WLAN + LAN 4.76V
Normal Mode + WLAN 4.80V
Normal Mode + LAN + USB Keyboard + Mouse 4.83V
Normal Mode + LAN 4.87V
Normal / Idle Mode 4.91V
Power Down Mode 5.03V

Note:
  • As i mentioned earlier, i just boot up my RPi and did not boot GUI. So basically my RPi is idling and do nothing. I call this state of RPi, "Normal mode".
  • Power Down Mode is where i shutdown my RPi and leave the power supply on. I achieve this by sending in command "sudo shutdown -h -P now". This is a rough estimation of the voltage level that my smartphone charger provides to my RPi.

Based on the Multimeter's reading that i get under different hardware configuration, the RPi is operating within 4.75V to 5.25V. So in this simple test we can conclude that the power supply used is capable of providing enough power to RPi under normal usage.You might notice the lowest voltage reading is 4.76V (very close to 4.75V lower operating voltage) where WLAN and LAN were turn on at the same time. So from this test you know you should avoid turning on both network at the same time. =)


Now you might ask, what is the accuracy of that multimeter, and how reliable this method is on rating the power supply? I would say, these readings are all estimation and it is not 100% accurate. This method can just give you an idea on how well your power supply perform, based on the specs given.

Ideally, regardless of what hardware configuration you use, voltage across the TP1 and TP2 should be always within 4.75V and 5.25V. If one of the hardware combination caused voltage across TP1 and TP2 drop below 4.75V, we can say it is either one of the hardware consume too much power, or the power supply is not capable of provide enough power for RPi to operate normally.

Here are some pictures on the measurement i get during the test.

Figure2: Normal Mode + WLAN and LAN

Figure3: Normal Mode + WLAN

Figure4: Normal Mode + LAN + USB Keyboard + Mouse

Figure5: Normal Mode + LAN

Figure6: Normal / Idle Mode (No other hardware connected)

Figure7: Power Down Mode (Measurement after shutdown)

I hope this post will be useful for you. Enjoy! Feel free to drop your questions in comment. =)


Disclaimer: Please use this site's info at your own risk. I am not responsible for any damage to your RPi or you. Cheers =)

Reference:
http://elinux.org/R-Pi_Troubleshooting
http://elinux.org/RPi_Hardware